
A capture preset defines the recording format of a Record or Loop flow: resolution, aspect ratio, frame rate, field order, container, codec, and audio layout. It also contains options such as burnt-in timecode, a logo overlay, and audio channel mapping. A flow records one file for each active capture preset, allowing a high-resolution preset and a proxy preset to run at the same time.
The Capture Presets page
Opening the page
In the sidebar, open Configuration, expand RECORD, and select Capture Presets. The header reads "Configure video capture settings and encoding options".
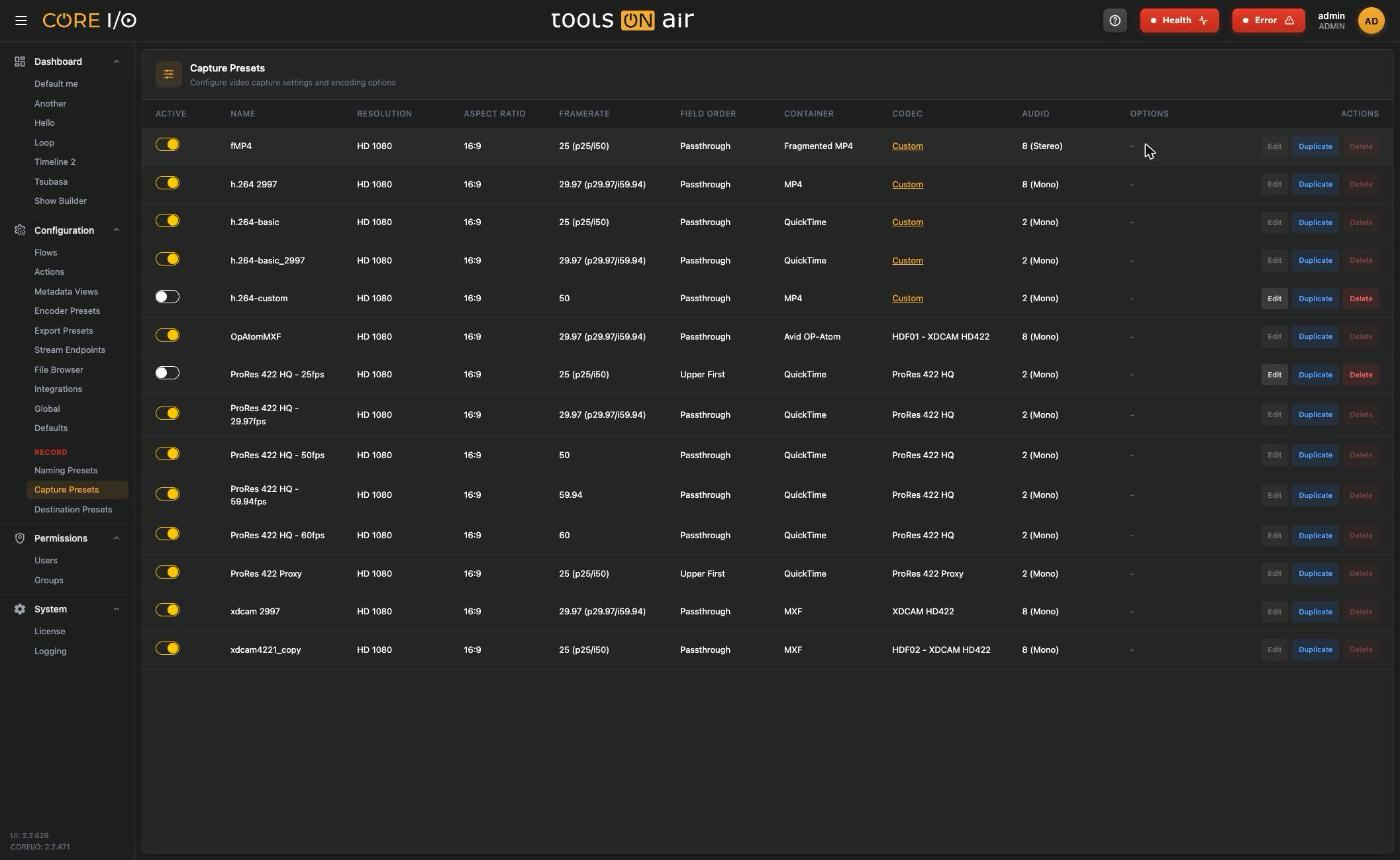
The Capture Presets table
Layout
Every preset is one table row with the columns Active, Name, Resolution, Aspect Ratio, Framerate, Field Order, Container, Codec, Audio, Options and Actions (Edit, Duplicate, Delete).
There is no Add button on this page: new presets are made by duplicating an existing one and editing the copy.
Activating a preset
The Active switch enables the preset for recording. While a preset is active, Edit and Delete are disabled; switch it off to change it. If the server refuses to deactivate a preset (for example because a flow is using it), the switch stays on and a toast shows the server's reason.
Editing a preset
- Click Edit on an inactive preset. The row changes to inputs and dropdowns.
- Change the required fields. Selecting H.264, DNxHD, or DNxHR opens the codec options dialog. Click ⋯ next to the codec to reopen it. Click ⋯ in the Options column to open the additional options dialog.
- Click Save. Click Cancel to discard all changes, including changes made in either dialog.
| Column | Options |
|---|---|
| Name | Free text. |
| Resolution | PAL, NTSC, HD 720, HD 1080, UHD, UHD 2 |
| Aspect Ratio | 16:9, 4:3 |
| Framerate | 23.976, 24, 25 (p25/i50), 29.97 (p29.97/i59.94), 30, 50, 59.94, 60 |
| Field Order | Passthrough, Progressive, Upper First, Lower First, PSF |
| Container | QuickTime, MXF, MP4, AVI, MPEG TS, Avid OP-Atom, Fragmented MP4 |
| Codec | ProRes 422, ProRes 422 HQ, ProRes 422 LT, ProRes 422 Proxy, AVC-I 100, AVC-I 50, XDCAM EX, XDCAM HD, XDCAM HD422, DNxHD, DNxHR, H.264, MPEG IMX-30, MPEG IMX-40, MPEG IMX-50, AVC-Intra 4K 4:2:2, HDF01 - XDCAM HD422, HDF02 - AVC-I 100 |
| Audio | 2, 4, 8 or 16 channels, each as Mono or Stereo |
The option lists come from the server and may differ on other backend versions.
Codec options
The dialog is titled Options.
H.264 has a Type selector:
Basic encodes with these fields: Overwrite Resolution (OFF or ON; when ON, Resolution W and H from 96 to 3840), Profile (Baseline, Main, High, High 10, High 4:2:2, High 4:4:4 Predictive, Quality Low, Quality Normal, Quality High), Speed (Ultra-fast to Placebo) and Bitrate in bit/s (digits only).
Saving the dialog without a valid bitrate shows "Please input correct bitrate"; saving the row without one shows "Please input bitrate".
Custom uses an Encoder Preset instead (see Encoders). The row's Codec column then shows an orange Custom link that opens the encoder preset; hovering it shows the preset name.
DNxHD and DNxHR have one field, Codec, with the flavour: DNxHD HQX 10-bit, HQ 8-bit, SQ 8-bit, SQ TR 8-bit; DNxHR RGB 444 10-bit, HQX 10-bit, HQ 8-bit, SQ 8-bit, LB 8-bit.
Click SAVE to keep the dialog values (they are written when you save the row) or CANCEL.
Additional options
The dialog title uses the format Options - <preset name>. Each toggle has a ⋯ button that opens its details after you switch the option ON.
| Option | Details |
|---|---|
| Burnt-in- Timecode | Renders the timecode into the picture. Set Timecode Size and Vertical offset from bottom using digits. Saving with a size of 0 displays "Timecode size must be positive". |
| Overlay Logo | Draws an image over the picture. Set Image path, Top Position, and Left Position. The path accepts letters, digits, slashes, periods, and spaces. Saving without a path displays "Image Path is required". |
| Audio Mapping | Routes input channels to file channels. Turning it ON loads a 1:1 mapping. The Input - File grid has 16 input columns, 16 output rows, and a - (Silence) row. Click a dot to create a route; each input can feed one output. All 16 entries must be set ("Audio mapping must contain exactly entries"). |
| Write Captions to Container | OFF or ON. |
| Video Encoder Threads | Number of encoder threads (digits only). |
Click SAVE to keep the values or CANCEL; Escape also closes the dialog.
Duplicating and deleting
Duplicate creates an inactive copy named <name>_copy with all settings and options. Further copies use <name>_copy(2), <name>_copy(3), and so on. A toast confirms "Preset duplicated."
Delete is available only for inactive presets and changes the buttons to Confirm and Cancel. The last remaining preset cannot be deleted; the page displays "This Capture Preset cannot be deleted."
Where capture presets are used
Record Viewer: the Capture IDs entry in the settings menu opens Update CaptureIDs for flow "<flow name>". Assign a capture preset and destination preset to each capture slot. See Record Viewer and Destination Presets.
Loop flows: the Capture Preset and Capture Preset Proxy fields on the flow's Type tab. See Flows.
Naming Presets: technical tokens such as codec, resolution, and bitrate are resolved from the capture preset of each output file. See Naming Presets.
Good to know
The Active switch only flips after the server accepted the change, so a refused change never shows a wrong state.
The page keeps its scroll position when a switch is toggled.
Cancel in the row also drops the values you saved in the codec and options dialogs; they are only written together with the row.