
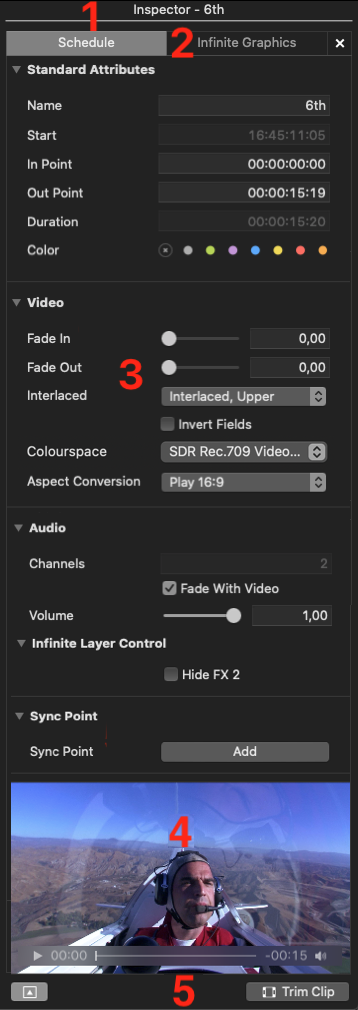
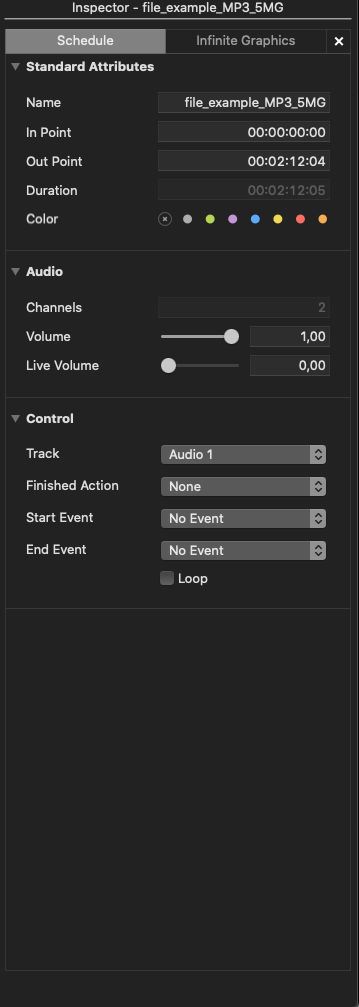
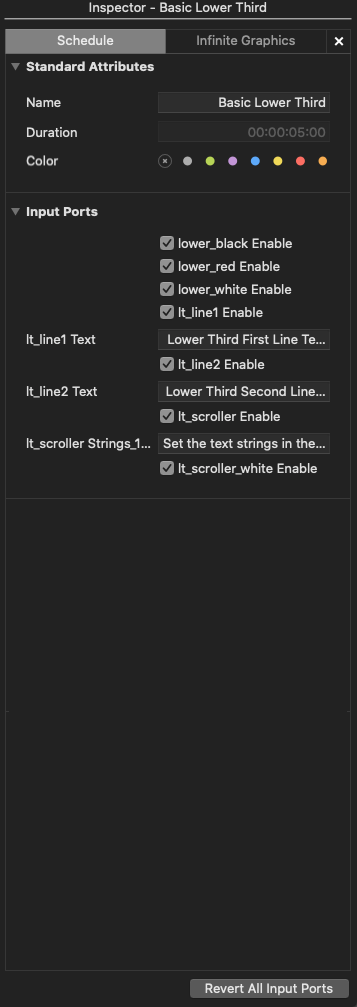
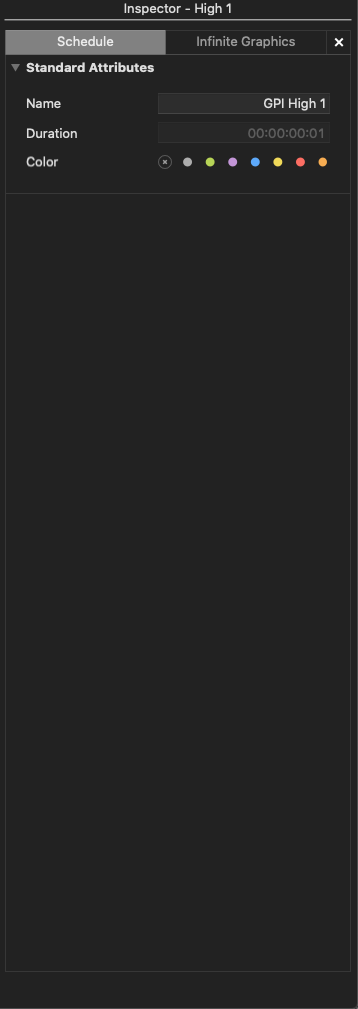
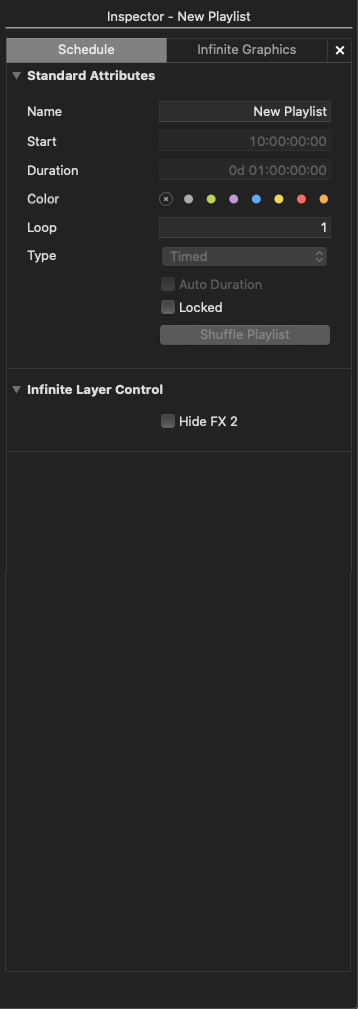
The Just Control Inspector (“Inspector”) shows the attributes of a selected item. You can click on the individual fields to edit the attributes. This figure shows the different states of the Inspector. Click on the figure to see a larger view.
Using the Inspector
Enter values directly using the keyboard.
Use the “Up/Down Arrow” keys to increase/decrease values.
Use the “Left/Right arrow” keys to switch between values.
Use the “Tab” key to switch between fields.
The following pictures show different states of the Just Control Inspector. It may look different on your system.
 |  |  |
|---|---|---|
 |  |  |
Name Of The Selected Item: Shows the name of the selected item.
Tabs:
Schedule: Change attributes of selected (scheduled) item(s).
Infinite Graphics: Change attributes of Infinite Graphics. This tab is only available if an Infinite Graphic has been defined by the administrator.
CHANNEL - channel related settings which you can change without stopping the channel
Attributes:
Standard Attributes: Shows all standard attributes like name, start/end time and so on.
Item Specific Attributes: Item specific attributes (if available).
Control items: Graphics Layer and Sync Point settings (where applicable).
Preview Area: Shows a preview of the currently selected item.
Control/Live Preview: Preview the incoming live signal.
Video: Preview the Video (Audio is played out using the System Audio device), or use the mouse to scratch through the Video.
Audio: Listen to the Audio file.
Realtime Graphic items can also be previewed here. Use the “Play” button to start the preview and to release a Stop frame.
"Fast Access" Button (changes in context to the selected item):
Video is selected: Allows you to Trim (Split) the Video.
Audio/Still Image/Event is selected: No function.
Graphic is selected: Allows you to reset all input ports (= reset all attributes to their default value).
Playlist is selected: The button allows you to save the selected Playlist.
Open/Close Preview Button: Click this button to show or hide the Preview area.
Refresh Button: Click this button to check for new elements on your storage.
Not all attributes are available for all kinds of elements (video, live element, placeholder, or gap).
Video (Live Event, Placeholder, and Gap) Specific Attributes
Standard Attributes
Name: Name of the selected item.
Start: Start time of the selected item.
In/Out Point: Sets the in/out-point of a Video.
Duration: Shows the duration of the selected item, depending on the defined in/out-point.
Colour/Automation
Color: Sets the colour of the selected item.
Set Auto-Hide Layer: Refer to the Chapter 15.11 Adding and Configuring a New Engine (v.2025.x) .
Video
Fade In/Out: Videos can fade-in/out up to 10 seconds from and to black.
Interlaced: Select an interlacing mode here.
Invert Fields: Inverts fields. This can also be changed during Playout of the selected Video and will be executed immediately (depending on the Video buffer your system administrator set in the Just Control Configuration panel).
Aspect Conversion: Defines how to handle the aspect ratio of the selected Video. Your system administrator should have already predefined a setting in the Just Control Configuration panel. Several options are available depending on the direction of the conversion. For a visual description, please refer to the chapter Aspect Ratio Control. It is possible to change the aspect ratio while a Video is on air. The change will be visible after six frames or up to three seconds later, depending on the buffer defined in Just Control Configuration panel. Ask your system administrator for more information regarding the buffer.
Colourspace: Defines how we handle the Colourspace of the selected Video. Usually there is no need to change this but could be useful in case of Rec.601/709/2020/2100 to HDR conversion and vice versa.
Audio
Fade With Video: When enabled, the Audio will automatically fade with the Video's fade-in/out settings.
Volume: Allows you to adjust the volume of a Video with a value between “0” (muted) and “1” (full volume). The volume can be changed while a Video is On Air and the change will be taken over immediately once the mouse button has been released.
Graphics Layer Control:
Infinite Layer Control: Your system administrator may have set up this channel to show one or several Graphics templates (Composition Builder or HTML-based) automatically all the time, and this option allows you to enable or disable the Infinite Graphics for the selected Element(s). The name of the layer shown here has been defined by the system administrator in the Just Control Configuration panel.
Simple Graphics (SFX) Layer Control: Your system administrator may have set up this channel to use Simple Graphics (SFX), which shows a Channel Bug and/or a Live Bug automatically On Air all the time. This option allows you to enable or disable the Simple FX for the selected Element(s).
Sync Point: Allows you to set a desired start time, where the difference to the real start time is then displayed in the control area. This is useful in case you have a “primetime clip” which should start as accurately as possible, but you have one or several events during the day when you need the “Jump to Next Clip” function. Define the Sync Point and every time you change something in the rundown, the offset of the wish start time and the real start time will be updated and shown right above the Timecode.
Trim Clip: Press this button to open the Trim Editor to change the In/Outpoint or to split the video.
Audio-Specific Attributes
Standard Attributes
Name: Name of the selected Element.
Start: Start time of the selected Element.
In/Out Point: Sets the in/out-point of the Audio Element.
Duration: Shows the duration of the selected item, depending on the defined in/out-point.
Color: Sets the colour of the selected Element.
Audio
Channels: Shows the number of Audio tracks.
Volume: Allows you to adjust the volume of the Audio clip with a value between “0” (muted) and “1” (full volume). The volume can be changed while the Element is On Air, and the change will be taken over immediately once the mouse button has been released.
Live Volume: This attribute is the same as the “Volume” attribute, but relates to the volume of the live input.
By default, the “Volume” and the “Live Volume” are set to “1” (full volume).
Realtime Graphic Specific Attributes
Standard Attributes
Name: Name of the selected Element.
Start: Start time of the selected Element.
Duration: Shows the duration of the selected item, depending on the defined in/out-point.
Color: Sets the colour of the selected Element.
Input Ports
Color Value: Clicking on the coloured bar opens a colour picker.
Checkbox: A checkbox is a boolean value (it can be unchecked or checked, “False” or “True”). In this case, the checkbox enables or disables a certain Element inside the selected Graphic.
Slider: A slider can be used to define a value roughly. The exact slider value is displayed in the text box on the right of it, which can also be used to modify the slider's value. A slider value has a minimum and maximum value.
Number Variable: A number value which can be positive or negative.
Text Field: Text in this field can be changed at any time. It accepts all characters.
All published input ports of a real-time Graphics item can be changed On Air.
Event-Specific Attributes
Standard Attributes
Name: Name of the selected Element.
Attributes: Are shown or not depending on the kind of Event.
Start: Defines the time of day the selected Element will be executed.
Duration: The duration of an event item is always one frame.
Colour: Allows you to set a colour for the selected event item.
Playlist Specific Attributes
Standard Attributes
Name: Define the name of the selected Playlist.
Start: While placing a Playlist in the Calendar View the start time is automatically defined. Change the start time here if needed. This option is greyed out if the start time is already in the past or defined automatically because the type of the Playlist is not “Timed” but “Chained”.
Duration: Define the length of the selected Playlist. This option is greyed out if the length is defined automatically, since the “Auto Duration” feature is enabled for this Playlist. We recommend having at least one Playlist per day and that a single Playlist is not longer than 24h.
Loop: Define if a Playlist should be looped. Once the number of loops is defined, you have to come back and change the setting here if you require more or less loops. In addition – when the content has been played once – you cannot change the content of the Playlist any more. To make changes again, reduce the number of Playlists and copy and paste the Playlists instead of looping them.
Type: With this setting, you can define if the Playlist starts at the predefined time (“Timed”) or if it automatically gets its start time from the actual end of the previous Playlist (“Chained”). Activating the type “Chained” guarantees that there is no gap between this Playlist and the previous Playlist (Refer to Chapter 7.2 Playlists & Playlist Types (Timed, Chained) (2026.x)).
Auto Duration: This attribute sets the length of the Playlist automatically to the total length of all Videos/live clips within that Playlist, and is automatically enabled if there is a live clip which has the “Infinite” option turned on. Inserting or removing clips from the Playlist with this option enabled will increase or decrease the length of the Playlist, as well as the start times of any following chained Playlists. This option is not available for empty Playlists. Enabling this feature makes sure that there is no Gap at the end of the respective Playlist.
Locked: This attribute allows locking the content and the start time of a Playlist. This means that none of the attributes of all Elements within that Playlist can be changed, and that pressing the “Jump to Next” button in a previous playlist will not change the start time. Please keep in mind that locked Playlists cannot be refreshed. See here for more information about refreshing of Playlists: 8.3 Refreshing A Playlist (2026.x)
Allow Resync: Your system administrator may have set up this channel to re-sync the master time to the reference time automatically. When enabled, frames will be added/deleted at the end of each Playlist (if required). For some kinds of Playlists (commercial breaks) you may want to make sure that every frame is played out. Deactivate this option to disable the re-sync function for the selected Playlist.
Color: Allows you to set a colour for the selected Playlist.
Shuffle Playlist: Press this button to shuffle the content of the Video layer of this Playlist. It is possible to use this function multiple times, the result will always be visible immediately in the Workbench.
Infinite Graphics Layer Control: Your system administrator may have set up this channel to show one or several Graphics automatically all the time. For some kinds of Playlists (commercial breaks) or for a single Element in the Video Layer, you may want to disable such a Graphic Element. Activate this option to disable the Infinite Graphic Element for the selected Playlist.
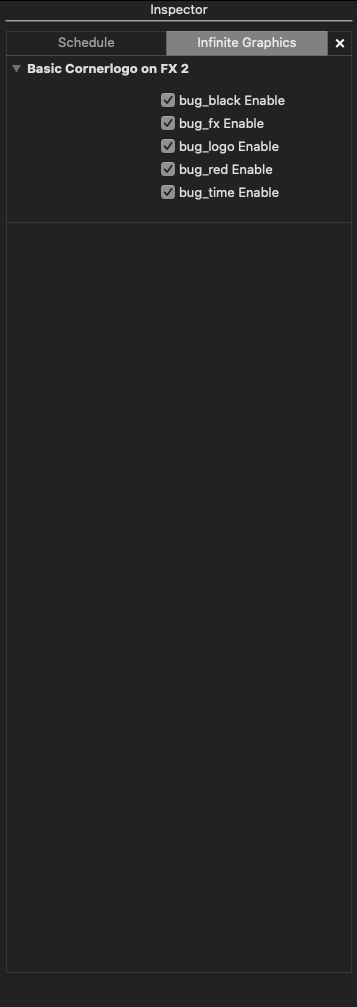
Infinite Graphics Tab
| This tab is only shown in case an Infinite Graphics has been defined before under the Channel Tab. Shows the name of the template as well as the name of the Layer. Below are the Published Input Ports. Depending on the Graphic template, you will see more or less attributes here, or even no options at all. The template seen in this figure was made with Composition Builder and the Infinite Graphics has been defined in Just Control. Here in the user interface, you can turn the Graphics on and off or change its (published) attributes. Please contact your system administrator if you have questions about the Infinite Graphics Layer configuration. |
A .qtz or .composition real-time graphics template used as an Infinite Graphics must contain ONE stop frame. Otherwise the Graphics will go off-air once the composition reaches its predefined composition end. Refer to the Composition Builder v.5.0 manual if you want to find out how to add a stop frame to your composition.
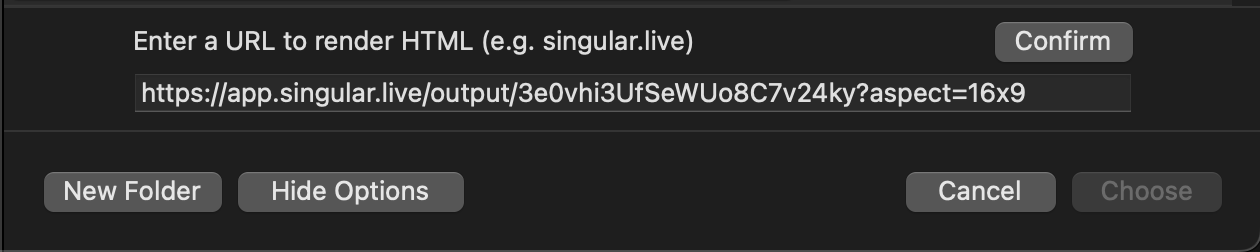
When using HTML Graphics originating for systems such as singular.live, Viz Flowics or SPX, you need to copy and paste the related Output URL into the URL field to render them in real-time.
Channel Tab
Shows all the channel related features, which can be changed during playout and which do not require a restart of the Just Play Lite application. Please contact your system administrator if you have questions about a Channel related feature.
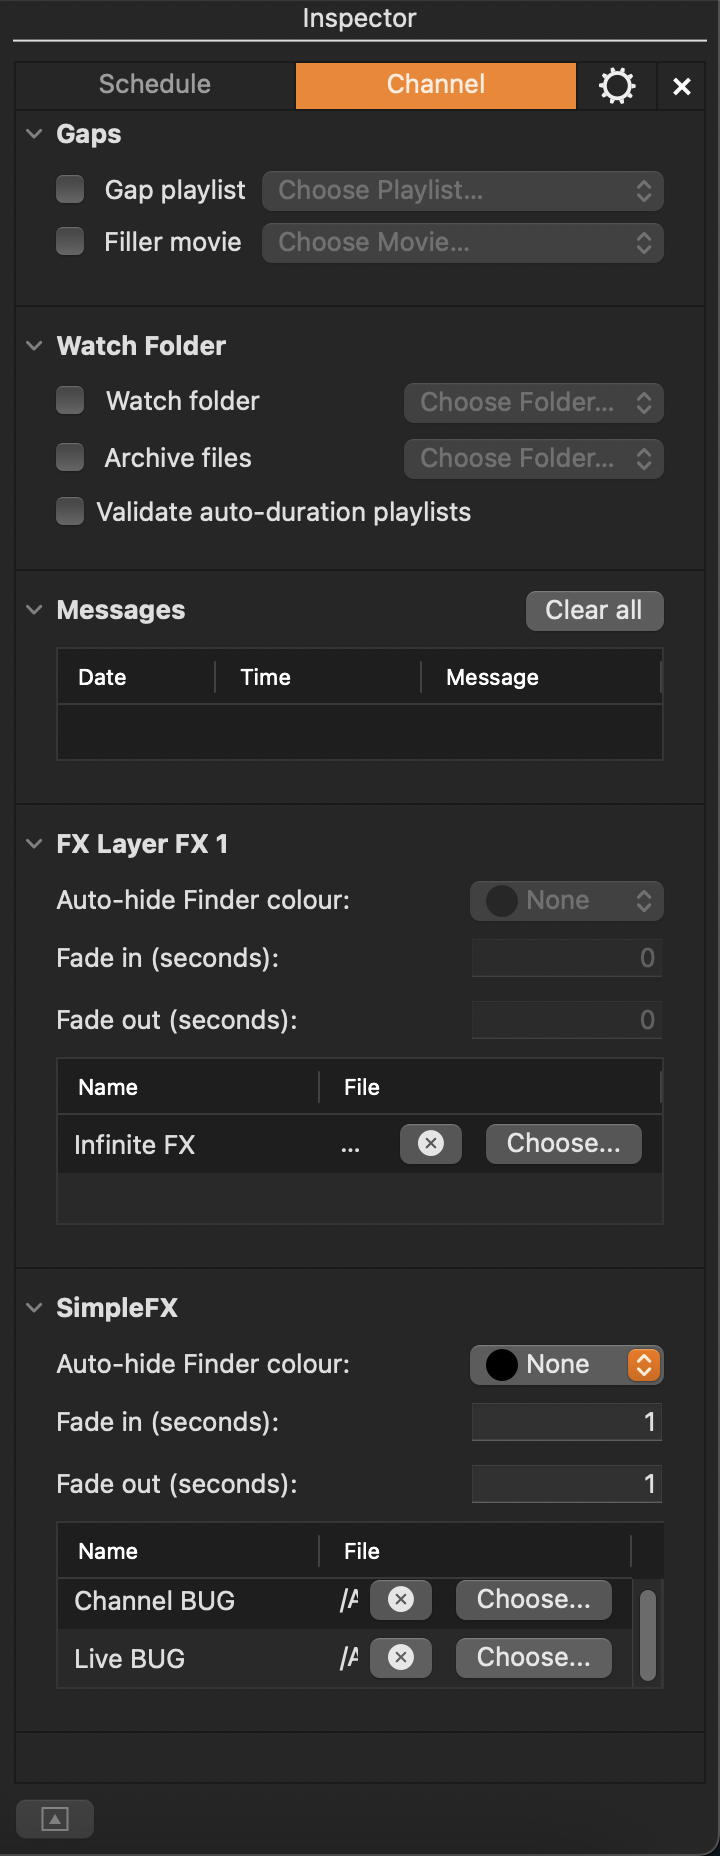 |
-File based: Click on the “Choose” button and select a still image or a real-time FX Template to load it permanently to the selected FX Layer. Click “X” to remove the still image or real-time FX Template from the selected FX Layer.
Each Channel comes with one Simple FX Layer, which can be used to show a still image as a Channel Bug and/or a Live Bug.
The Channel Bug will be scheduled automatically with every element in the video track, and the Live Bug with every Live element which is added to the rundown. Every Simple FX graphic can then be controlled individually for each element using the Inspector. |